Friday, June 29, 2012

Ptarmigan

Ptarmigan, Nunavut, June 2012

Photo Credit: Tim Rast

Wednesday, June 27, 2012

Sculpin

Sculpin, Burgeo, Newfoundland and Labrador 1997
Photo Credit: Tim Rast

Monday, June 25, 2012

Peary Caribou

Peary Caribou, Bathurst Island, Nunavut, 1994
Photo Credit: Tim Rast

Friday, June 22, 2012

White-tailed Jack Rabbit

White-tailed Jack Rabbit, Alberta, March 2012


Photo Credits: Tim Rast

Wednesday, June 20, 2012

Art in Laguardia, Spain


Photo Credits: Tim Rast

Monday, June 18, 2012

Laguardia, Spain

Laguardia, Spain. October 2011
Photo Credit: Tim Rast

Friday, June 15, 2012

Labret and Fieldwork

Broken to match the artifact
This is the time of year when I put the blog on autopilot and head north to do fieldwork.  I cut things so close with filling orders this year that I don't have a big archive of scheduled posts built up, but I'll try to at least get a photo or two put up every Monday, Wednesday and Friday.  For now, these are the finished reproductions of the labret from Cape Krusenstern.  The last time I blogged about these pieces, they were still unfinished.  At that time I found them very uncomfortable and sharp, but since then I've worked them down a little more and softened the edges and they really weren't that uncomfortable afterall.

Jet Labret - They are made from a type of coal.  I used Lignite in the reproductions, but cannel coal was more likely used for the original artifact.
Photo Credits: Tim Rast

Wednesday, June 13, 2012

Completed Choris and Thule Pottery

Thule pot sherd and pot
Here's a look at the end product from the Thule and Choris pottery that I was working on earlier this spring for the Cape Krusenstern order.  The goal was to produce two large paddle impressed sherds of Thule pottery based on a specific artifact and an assortment of at least two fragments of paddle impressed Choris pottery.  The complete vessels shown in the photos were back ups in case I ran into problems and needed more pots to break.  Luckily, I didn't have major problems and I have a complete Thule and Choris pot to display in my office.

The sherds came from the half pot
 I'm very pleased with how the clay pots turned out.  In the future I'd like to experiment more with the firing process and see if I can't get a harder ceramic, but based on what I've read about Alaskan pottery and other people's experiments, these vessels are well within the range of pottery that was produced in Alaska.  They are very soft and really not much more than dried clay.  When I cut the Thule pot in half with a dremel to create the two large sherds the vessel walls had the consistency of drywall.  There was a very thin glazed layer, especially on the inside that was a little harder and more durable that I believe formed from the seal blood and fat layer in the firing.  Considering how soft the interior of the walls were this layer would have been pretty important in protecting the vessel and keeping it all in one piece.

These are the final sherds that I included in the order.  I touched them up a bit to antique them, but generally I'm pleased with the results.  They look a lot like the sorts of sherds that show up in archaeological sites.
A complete Choris pot and sherds from a similar vessel
Photo Credits: Tim Rast


Monday, June 11, 2012

Cape Krusenstern Order Finished

Finished!
 I finally finished all of the reproductions in the Cape Krusenstern order.  The reproductions are based on artifacts spanning several thousand years from the Denbigh Flint complex up to Thule and include ceramics, chert and obsidian lithics, chipped and ground slate, ground and polished nephrite, and carved jet and antler tools.  There are 23 different artifacts in the set and I made two identical reproductions of each which were antiqued to match the originals.  A lot of the materials were familiar, but several of the cultures, like Choris and Ipiutak, were new to me as were the jet labret and pottery.  It was an enjoyable project and there are a few specific pieces that I'd like to show in a bit more detail in the upcoming posts, but for now - here is a look at the full set.

Lots of antiquing - I'm pleased with how dusty and old the reproductions look.

In addition to all of the pieces shown here there are a couple bags of miscellaneous flakes which I'll send to the client that were left over from knapping some of the bifaces.
Photo Credits: Tim Rast

Friday, June 8, 2012

Wrapping up at The Rooms

Parents volunteers are awesome
On Tuesday morning, I had my last Open Minds classroom visit of the year at The Rooms and I'm looking forward to next year.  The ground stone or ulu making sessions have been really popular with the kids.  I like doing the flintknapping demonstrations, but there are some real memorable learning opportunities  when the kids get to work with their hands and create something that they can keep.  Its much safer and easier to do that with ground slate instead of knapping stone or glass. We sure get dusty though!

Discussing what they learned.
Photo Credits: Tim Rast


Wednesday, June 6, 2012

A couple more Cape Krusenstern reproductions

A reddish brown biface
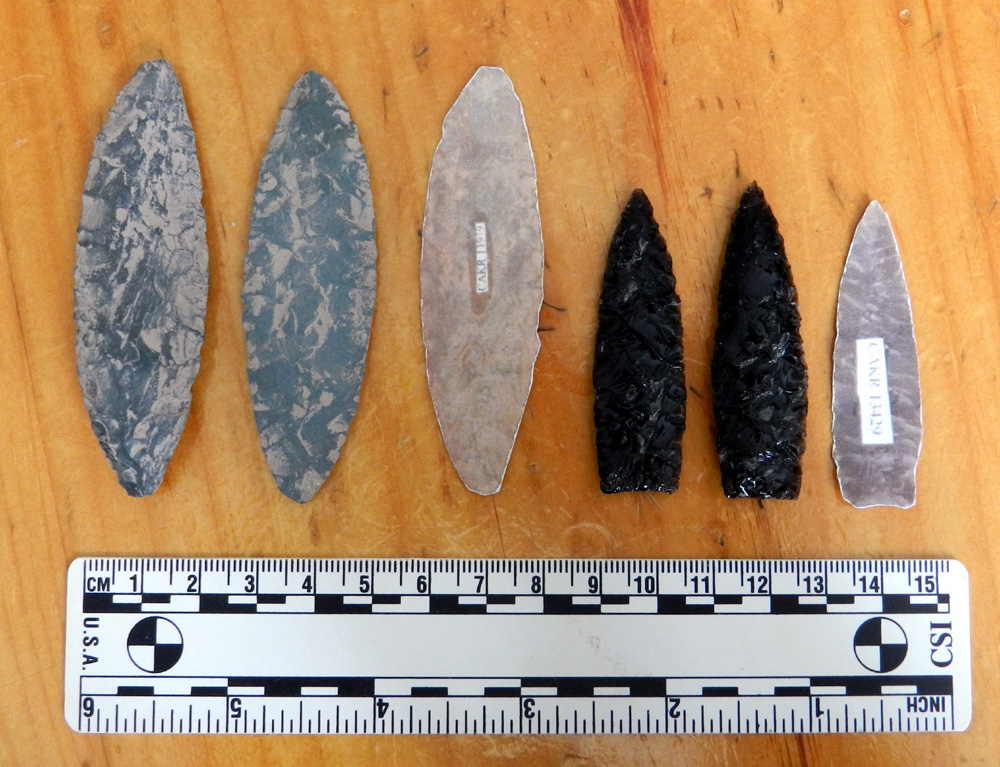
I'm trying to wrap up the Cape Krusenstern reproductions this week.  I need to ship them as soon as possible and be ready to head into the field by the end of next week.  Here's a look at a couple of the most recent reproductions - a biface and a knife handle.  The biface is identified in the documents that I was supplied with as belonging to the Ipiutak culture.  I don't know enough about Ipiutak bifaces to know how typical it is, but I found the form interesting - it looks like a projectile point to me, although it has a rounded tip and is widest towards the tip.  A bird blunt maybe?

more orangey-red
Aside form the shape of the tool, the red chert or jasper that it is made from sets it apart from the other lithics in the collection.  I used a red chert from Newfoundland that I often use for red reproductions and was happy with the results.  It was a nice dark reddish brown or burgundy colour.  But I also had a piece of mookaite that I picked up in Calgary in February.  Mookaite is mottled red and yellow, and I found a patch of red big enough to fit one of these bifaces in.  It came out a much brighter red, which also seems to be a good match for the reference photos.  Its really hard to match colours from photos alone, but of the red rocks that I have available I can't really tell which is the closer match.  When you see them side-by-side the darker one doesn't seem red at all.  It kind of strange - if you show someone the darker one first and ask them the colour they will say "red", but after you show them the brighter stone they can't see the red colour in the first point anymore - it just looks brown.  I'm not sure which one is closer to the original, but hopefully they'll both work in their separate sets of reproductions.

Two handles and two bifaces.
Slotted knife handles
The second piece in this batch is a knife handle with a slot for a narrow metal or stone blade at each end.  Each slot also has a drilled hole associated with it.  The handle is broken through the hole on one end.  The original artifact looks like it was made from ivory or possibly very dense bone, but I used antler in the reproduction to avoid marine mammal parts.

Photo Credits: Tim Rast

Monday, June 4, 2012

Friday, June 1, 2012

Choris Reproductions

Obsidian Choris Points
Two by two, I'm working through the Cape Krusenstern order.  The most recent reproductions to go into the finished box are a pair of Choris points and Choris bifaces.  I'd mentioned the diagonal flaked Choris points before, but it turns out that the original artifact was made from obsidian.  Since it was the only obsidian artifact found at this particular site its material type was important enough to redo the point in the correct material.  Its not a bother - I get to keep those little flint Choris points that I made a few weeks ago.

The reddish mud coating the bi-pointed biface on the left helps match the original artifact.

A dozen or so pieces are finished, although I do keep going back and tweak the antiquing. The more layers of mud or staining that goes on a reproduction the more depth and age the piece takes on.

Related Posts with Thumbnails