Wednesday, June 30, 2010

Archaeology Blogs - some summer reading

Big sigh... the L'Anse aux Meadows artifacts and reproductions are out the door and on their way to the new exhibit on the Northern Peninsula.  Rumour has it they are aiming for a July 15th opening.  I just have a few pieces of jewelry to card and ship today and then I'm pretty much done with filling orders until the end of the summer.   Fieldwork will be taking me away from Elfshot soon, both the business and the blog.  I'll be away for six weeks during July and August and I need to start making the switch to gearing up for the field.

In the meantime, why not check out these archaeology blogs?

E’se’get Archaeology Project: Matt Betts from the Canadian Museum of Civilization will be working along the south coast of Nova Scotia excavating midden sites.  He's anticipating finding lots of faunal remains and will be working with local communities to provide a field school for Mi’kmaw high school students.  Matt, his crew, and his students will be offering updates of their latest discoveries on the project blog.  You never know what might pop up!

Out of Ice and Time:  This is an intriguing new blog by Anne Jensen, an arctic archaeologist living and working in Barrow, Alaska.  Anne is offering a candid look behind the scenes at her life and her work.  This blog will appeal to everyone with an interest in northern archaeology, but there's a depth to it that goes beyond simply presenting her project to a public audience.  I think her honest discussions of her day-to-day life will resonate with professional archaeologists and give students planning on entering the discipline some good points to consider.   I was hooked after reading her latest post, Living where you work has its downsides

Beyond Stone and Bone: This is Archaeology Magazine's blog and its updated weekly by posts from Mark Rose and Heather Pringle.  The topics can be anything archaeology related.  Elfshot: Sticks and Stones even made its way into the latest post by Heather, The Top Five Archaeological Bloggers. I certainly appreciate making the list!


Photo Credits:
1: Tim Rast
2-4: Screen captures from each of the blogs mentioned

Monday, June 28, 2010

Genuine Sealskin Bindings and Ice Picks

One for Parks, one for me
I'm trying to wrap up a few loose ends this week.  I have a couple small orders to finish and the L'Anse aux Meadows reproductions should be dry enough to pass them along to Parks Canada so that they can be installed in the new exhibits at the site.

wrapping the lashing
I had the first opportunity to use the hooded sealskin on the adze and harpoon reproductions last week.  I worked with the 30 foot section that we shaved a few weeks ago.  The line had been stretched and drying in the backyard since then.  I took it down and stored most of it in a rubbermaid filled with wood shavings.  I'm still not exactly sure what to do with it.  It'll take days to shave, but I don't really want to do much more with it right away.  Right now it looks like I might try storing it with the hair on and shave lengths as I need them.

I cut all of the sealskin that we shaved down the middle
Even split it was still thick enough
To make the lashings, I cut off the shaved section of thong from the rest of the line and soaked it in warm fresh water for a few hours until it got soft again.  Since I'm using it for lashings, I wanted it to be flexible and stretch a bit while I used it so that it would shrink as it dried and create a stronger bond.  When it had softened I cut it lengthwise down the middle.  If that keeps up I might be able to double the amount of usable skin in the 335 foot long thong.

Ice picks for the Groswater Harpoons
This is what the whalebone ice pick on the harpoon looks like under the lashings.  Its not based on any specific Groswater artifact.  The long tapered end is designed to fit the scarf joint on the end of the harpoon and the shape of the point is inspired by Groswater bone points from Port au Choix.  The scarf join on the harpoon shaft was very long and shallow.  If the taper was a little steeper and the scarfed section half the length, then the ice pick would look similar to a common Dorset Palaeoeskimo artifact, with an unknown, or at least, uncertain function.

Dorset Whalebone Reproduction
This is a reproduction of one of the Dorset artifacts that the ice pick reminds me of.  I made this using stone tools a couple winters ago for Patty Wells, a Ph.D. candidate at Memorial University who is studying Dorset organic tools from Port au Choix.  The form is similar to what an ice pick should be, but I still don't understand what the hole and groove would do.  The square holes are a good fit for a sealskin thong, which has a rectangular cross-section compared to other types of cordage which are round.  If they are icepicks, then the hole and the groove would be on the end under the lashing - what function would they serve? 
Using pliers to hold the end of the line
To haft the whalebone icepicks on the Groswater harpoon I did start the wrap by tucking one end of the line under itself at the point where the hole is on the Dorset artifact.  I didn't do that to try to match the Dorset artifact, it was just the most convenient place to start the wrap.  I used pliers to hold the line in place because it was so slippery, but a hole in the icepick could have done that job for me.  That doesn't really explain the groove though, unless I wanted to be really tidy, then I could have carved a groove in the pick for the line to lie flat in while I wrapped the lashing around it.  Or, more likely, if I wanted that line to run back down the length of the harpoon towards the harpoon head, then I could have carved a guide channel, threaded several feet of line through the hole, laid it in the groove and wrapped the lashing around it, so that part of the line is tied down in the groove and the rest of the length is free.  That scenario would account for all the functional elements of the Dorset artifacts.  Maybe that free line running parallel with the shaft could be used to help launch the harpoon or secure the harpoon line.  I'm not sure.  Its the sort of thing that you could come up with a dozen different ways to make it work and still never figure out the right one.  There's also no guarantee that these objects had anything to do with harpoons - they could have been hafted on to a completely different type of tool altogether.

Photo Credits:
1,3.5: Tim Rast
2,4: Lori White
6: Patty Wells

Friday, June 25, 2010

L'Anse Aux Meadows Groswater Palaeoeskimo Harpoon

The harpoon; reproduction and artifact
Here's a look at the completed Groswater Palaeoeskimo harpoon reproduction based on that amazingly preserved wood shaft found in a bog on Newfoundland's Northern Peninsula.  The tamarack harpoon shaft was recovered during archaeological excavations at L'Anse aux Meadows in the 1970s.  The original artifact was radiocarbon dated to 2970+/-110BP and this reproduction illustrates how it would have looked when it was first made and used almost 30 centuries ago.

The artifact was a remarkably complete and well preserved harpoon mainshaft
wrapping the icepick onto the mainshaft
The harpoon has a square cross-section with slightly rounded edges.  Its remarkably consistent in width and thickness along its 121 cm length, varying only a millimetre or two between 23 and 24 mm from end to end.  It only deviated from that constant diameter where the wood worker removed wood to allow another piece of the harpoon to be strapped into place. There is a long taper at the base where something would have been scarfed onto the mainshaft.  Sometimes Palaeoeskimo harpoons were scarfed together out of several short sections of wood, especially at sites above the treeline where the only available wood would be driftwood. 
Most of the ice pick is under the lashing
The L'Anse aux Meadows harpoon is long enough as it is, so I don't believe that an extra wood section would have been lashed to the scarf.  I think its more likely that it was an icepick of some kind, made from bone, antler or ivory.  We decided to use whalebone on the reproduction.  Ice picks were handy tools when hunting seals on the ice, to test for dangerously thin ice while walking,  to chip away and enlarge a seal's breathing hole, or to pin into the ice to create added leverage while hauling the harpooned prey out of the water.

The narrowings on the artifact told me wear to add the lashings on the reproduction
The harpoon line passes through the strap
A narrowing was added to the shaft close to the foreshaft socket that I believe was designed to lash the harpoon line in place.  Having some place on the mainshaft to secure the harpoon line would allow some tension to be put in the line to help secure the harpoon head and it would also keep all of the harpoon pieces together when the the seal was stabbed.  I can't be certain exactly how this lashing would have worked, but I think the narrowing in the wood indicates where the line was attached.

A clever slipknot to create line tension
Here's an interesting trick that I just learned from Eskimos and Explorers by Wendell Oswalt to attach the harpoon line to this type of lashing.  Rather than thread the entire line through the lashing, a single small loop could be threaded through.  This creates a kind of slip knot that lets the harpooner place tension in the line to help secure the harpoon head, but the moment that the prey tugs on the harpoon head it would let go and allow the harpoon head to detach and toggle.   If you search out Oswalt's book, he also has an excellent description of how ice picks were used to create leverage while hauling a harpooned walrus out of the water.


The socket still works
I think when you see the socketed end of the main shaft next to the reproduction you can see how carefully shaped and well-preserved the artifact is.  It might look like a random fracture at first, but you can see how carefully prepared the the scarfed surface is, how the binding area for the scarf lashing is carved out, and even the depth and shape of the socket for the foreshaft.  The lashing is there to secure a small wedge of wood that forms the other half of the open socket.  I explained that in a previous post.

There is some damage to the socket, but you can still see the well defined lashing area and the start of the scarf join at the tip of the harpoon.
The harpoon head would toggle inside the seal
I made two copies of the harpoon, one for L'Anse Aux Meadows and one for myself.  Both are identical, with a Tamarack shaft with sealskin bindings, a whalebone ice pick, antler foreshaft, antler harpoon head, chert endblade with sinew lashings and a sealskin line with a braided sinew lanyard.  The chert endblades are based on artifacts that were found in the Groswater component at L'Anse aux Meadows and tied on to open socket, Groswater style toggling harpoon heads.

You can read the previous posts documenting the reconstruction of this artifact by following these links:


L'Anse aux Meadows Harpoon - First Impressions

The Hunt for Tamarack

Return to the L'Anse aux Meadows Harpoon

Area Man Makes Scraper, Looks at Harpoon

Adze and Harpoon Build Photos

 
The complete set of Palaeoeskimo artifacts and reproductions for L'Anse aux Meadows


Photo Credits: Tim Rast

Wednesday, June 23, 2010

L'Anse aux Meadows Adze

Completed adze, scraper, and knife
The L'Anse aux Meadows reproductions are finished now and I'm just waiting for the sealskin binding on the adze to dry before sending it all off.  The original adze head that the reproduction is based on is being driven to L'Anse aux Meadows at the moment so I darted in yesterday morning for one last side-by-side comparison before it was packed up and escorted away.

Adze reproduction and artifact
Palaeoeskimo Adze:  An adze is a wood working tool with its head mounted at right angles to the handle, looking kind of like a hoe instead of an axe.  None of the organic components of the artifact were preserved, I just had the ground stone bit to start from.  An axe will be symmetrical, with the blade aligned in the middle of the head, while an adze will usually be sharpened so that the bit is closer to one face or the other.  This one was made on a large flake of tough (perhaps silicified) slate.  Most of the dorsal surface of the adze head was completely ground and polished, so the only remnant of the original flake is on the ventral surface.  The most distinctive feature of the adze head is the isolated stem opposite the bit end.  That provides an important clue for how it would have been hafted.

Note the stem on the artifact
The Maritime Archaic adzes that we find tend to be relatively long and narrow, without a contracting stem.  At Palaeoeskimo sites (especially Groswater Palaeoeskimo sites) in the province, we find shorter, wider adzes with a contracting stem designed to fit into an antler socket.  The L'Anse aux Meadows adze is the largest adze of this kind that I've seen, so its tempting to associate it with the Maritime Archaic culture, because they were known for their large ground stone tools.  However, every feature of its construction - especially the stem, suggest a Palaeoeskimo and probably Groswater Palaeoeskimo origin.  I think its the biggest Groswater Palaeoeskimo adze in the world.

Giant Palaeoeskimo adze, small Maritime Archaic Adze
I'm not aware of any antler sockets from Groswater sites, but caribou antler adze sockets are a common artifact in Palaeoeskimo sites across the North, including Dorset sites in Newfoundland.  I think they are pretty clever.  The antler acts as a shock absorber that probably helps extend the life of the tool and I'd guess it might help with hand shock on the user, but I couldn't say for sure.  It also allows smaller bits of stone to be used.  In the earlier, one-piece Maritime Archaic Adzes half of the adze head is used for cutting and the other half of the adze head is used for hafting.  The antler socket divides that job up so that the stone adze bit can focus on cutting and the antler takes care of the hafting.  Using the socketed design, you can do the same job but with a stone half the size.

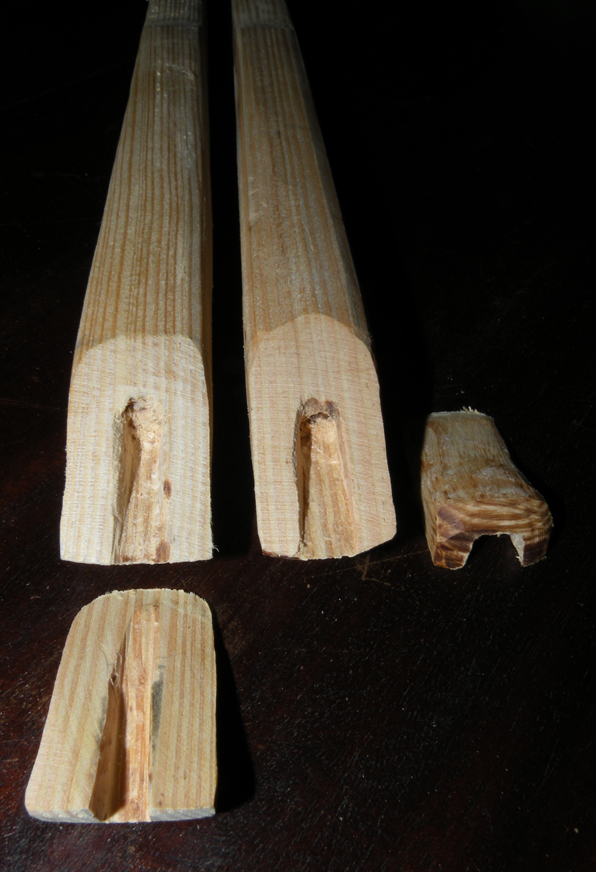
The antler socket will be lashed to the handle
I didn't have a piece of antler that fit the adze without bending, so I had to soak the antler in vinegar for a couple of days and slowly wedge it open wide enough to accept the adze head.  This created a very secure fit.  Its important that the adze is firmly mounted in the spongy antler in the middle of the antler, you don't want to cut through the dense antler around the edges or the antler will crack in use.  The natural flare of the antler is used to create the V-shaped socket.  The narrow end of the adze sockets are modified for hafting and the artifacts from Port au Choix that I used as references for this reproduction tend to have flat blunt ends, so I think they were designed to butt up against a wood shelf in the handle.

Tamarack handle, caribou antler socket, slate adze
The handle is tamarack and I did a lot of research trying to find Palaeoeskimo adze handles for references, but they are pretty scarce.  I based this one on an artifact from a Baffin Island Dorset Site.  The biggest difference between this reproduction and the artifact was that the artifact adze handle was a simple "L" shape, without the raised back at the top for the butt of the antler socket to rest against.  I'm not done thinking about adzes - if anyone knows of any other Palaeoeskimo adze handles, I'd love to hear from you.

Comparing the bit edge
The handle is made from a fork in a tree branch, which is trick used by adze makers around the world to create a strong "L" shaped bend in their handles.  The wood shelf that the antler is tied to is just a mirror image of the hafting area of the socket.  I'm satisfied that it looks like a Palaeoeskimo haft.  The binding is the sealskin from the hooded seal that we prepared this spring.  I'm very happy with how it turned out.  That black air-dried look is exactly what I wanted on my reproductions.  I'll talk more about working with the sealskin in a future post, but so far all of the lashing that I've used have come from cutting the shaved sealskin in half down the middle.  Which means that the 335 feet of skin could yield 670 feet of useable lashing.

On Friday, I'll show you the finished Groswater Palaeoeskimo harpoon.

Photo Credits: Tim Rast

Monday, June 21, 2010

Ground Slate and Soapstone School Visit

Using the bow drill on slate
I spent this afternoon with Mrs.William's Grade 3 class at Holy Family Elementary School in Paradise.  We talked a few minutes talking about the people who used to live in Newfoundland and Labrador, from the earliest Maritime Archaic Indians, through the Palaeoeskimos, up to the Beothuk, Innu, and Inuit.  We talked about the slate tools that they made, like slate lances, ulus, knives, axes, adzes, and endblades and their soapstone tools like plummets, bowls, lamps, and carvings.  Then we spent the rest of the afternoon grinding our own tools and carvings out of soapstone and slate.

Filing some stubborn soapstone
The soapstone that I took in turned out to be pretty tough to work with hand tools, and I really admire the kids persistence with sticking with it.  By comparison, the slate was much easier to work.  We were making slate ulus and men's knives.  Based on the experience at The Rooms with a similar workshop, I tried to weed out all of the thickest pieces of slate before going in because drilling all those holes through thick slate with a bow drill can be exhausting.  I was really grateful for the parents who stayed and helped with the bow drills.  The kids did a fantastic job with the grinding and filing, but the bow drills are a little tricky to operate at first.

Filing slate - the thinner the better
Mrs. Williams was kind enough to take photos of the afternoon.  I think everyone in the class did a great job and they didn't seem to mind the dust and mud one bit!


Grinding Slate

I had to show off the new L'Anse aux Meadows Groswater Harpoon

A bow drill volunteer
Photo Credits: Marie-José Williams

Friday, June 18, 2010

Adze and Harpoon Build Photos

The L'Anse aux Meadows Groswater Palaeoeskimo harpoon reproductions are almost ready to lash together.  I'll use sinew and hide glue to tie the endblades onto the harpoon head and to wrap through the groove around the open socket.
I used tamarack scraps for the wedge shaped piece that forms the other half of the open scarfed and grooved socket on the harpoon.  I'll use the hooded sealskin for the lashing to hold it in place.

The harpoon heads are antler and the endblades are chert.  The open sockets are cut into the base of the harpoon head through their ventral face.  The harpoon head on the left is shown dorsal side up and the one on the right is ventral side up.

These little wedges of wood weren't found with the artifact at L'Anse aux Meadows, but they would have been necessary to mount the foreshaft solidly.  There's no rule that they had to be made out of wood.  Priscilla Renouf and her crew at Port au Choix have found little bone or antler artifacts in Groswater contexts that appear similar to these pieces, at least in photographs.  When everyone gets back from the field at the end of the summer, I'd like to take a peak at those artifacts in person.
Tracing the adze in the lab.
Finished reproduction adze head.  I might keep sanding it to a higher polish, but the shaping is all done.

The adze head is designed to fit into an antler socket.  A section of caribou antler would have been used where it begins to flare out.  The artifact is sitting on the antler in a good spot to cut the socket.
This is the reproduction in the antler socket that I cut from the antler in the above photo.  Unfortunately, I cut this socket a little short and tried to work it while it was too dry.  The adze cracked the socket while I was wedging it in place.

I had to start over with a new piece of antler.  I'm soaking this one in vinegar before trying to wedge to adze head in place.  Hopefully it will be soft enough that it will mould itself around the adze head.  I did this on an adze socket last summer and it work well and when it dried it held its new shape.

The antler adze socket will then be lashed onto a wood handle.  I'm hoping that this forked piece of tamarack will do the trick.
Photo Credits:
1-4,6-10: Tim Rast
5: Lori White

Wednesday, June 16, 2010

Area Man Makes Scraper, Looks at Harpoon

Marking out a cut
The chert endscraper is done and I've had a couple quick trips to the Archaeology Lab at The Rooms this week to check on the harpoon and adze progress.  I think I have enough information now to complete the rest of the reproductions in the L'Anse aux Meadows set without having to go back to the lab again until the final comparison.


Endscraper reproduction and artifact
Hafted Endscraper: The scraper is made on a retouched chert flake and mounted in a softwood handle with sinew and hide glue.  The original artifact was made on a  very thin, fan shaped flake.  The only retouch is on the endscraper edge.  The trickiest part of this reproduction was finding a flake that was already very close to the shape of the artifact, so that I wouldn't have to do very much retouch along the sides.  Its quite a fragile scraper and must have been used for very light work.  Even so, it would have required a bit of skill to use without cracking.

L'Anse aux Meadows hafted endscraper reproduction

Harpoon shaft and reproductions in progress
Each visit with the Groswater harpoon shaft reveals more details of its construction.  It can be difficult to predict which details may turn out to be significant so I'm trying to match everything as closely as possible.  There are always problems that come up while building a reproduction and those problems can have many different solutions.  Determining which solution the ancient craftsperson chose to solve a particular problem is an opportunity to learn a little bit more about their culture.  I also want to make sure that the solutions I build into a reproduction are the same solutions that the original maker chose when they encountered the problem.

The thickness follows the wood grain
For example, I've mentioned how tamarack has a tendency to split between growth rings.  Without access to tablesaws or even metal planes, the Groswater harpoon maker used that property of the wood to his advantage to create a wood shaft of uniform thickness.  By selecting a straight tree with even growth rings and splitting the wood between the rings they were able to create a flat, even harpoon blank.  In cross section, the top and bottom of the harpoon follow growth rings and remain a constant thickness of 23-24mm along its entire length.  All of the additional cuts to the wood were made at right angles to these rings, cutting across all of the growth rings.  I think this was intentionally done to give the maker more control over the cuts and create a stronger shaft that was less prone to cracking.  By cutting the scarf joints across the grain you avoid the risk of a crack starting between growth rings and running away on you.

This is the scarf join on the bottom of the harpoon.  The cut doesn't violate any of the growth rings.  I coloured the top surface green in the photo to help show where the edges are and how the taper is formed.
 
New foreshaft, old main shaft
I took an antler foreshaft with me to try against the harpoon shaft yesterday and was amazed with the results.  The foreshaft fit into the grooved and scarfed socket in the 2900 year old artifact perfectly, aligning perfectly straight.  The fit was so good that it almost felt like it was snapping into place.  I looked more closely, and there is actually a flat patch of compressed wood inside the channel where the original foreshaft would have been pressed into place.
It fits and aligns perfectly
This channel extends about an inch into the wood and although one of the side walls of the channel is broken away, there is a tiny remnant left of the channel wall on the other side.  The flat wall and compressed wood isn't very noticeable until you know to look for it, but they are preserved well enough that a new foreshaft clicks into place even after almost 3 thousand years of disuse.  A small wedge of wood (or maybe antler) would have formed the opposite wall of the socket and would have be lashed on to create a secure, enclosed channel to hold the foreshaft firmly in place.  The Groswater Palaeoeskimo didn't have drills, so a channel like this is a challenge to make.  They had to open up the wood from the side, gouge out the channel and then close the hole up again with the second piece scarfed and lashed into place.


You can see the open sockets on the harpoon bases.
Conceptually, its the same solution that the Groswater Palaeoeskimo used to create the socket in the base of their harpoon heads.  They couldn't drill the hole up from the base, so they cut it in from the side.  This is what is meant by an "open socket".  The open socket on the harpoon head might be partially enclosed by a lashing that circles around the harpoon head, while the open socket on the harpoon would be closed with an additional wedge of wood tied into place.

Photo Credits:
1: Lori White
2-10: Tim Rast
Related Posts with Thumbnails