Monday, November 30, 2009

Harpoon and Ballistics Gel Outtakes

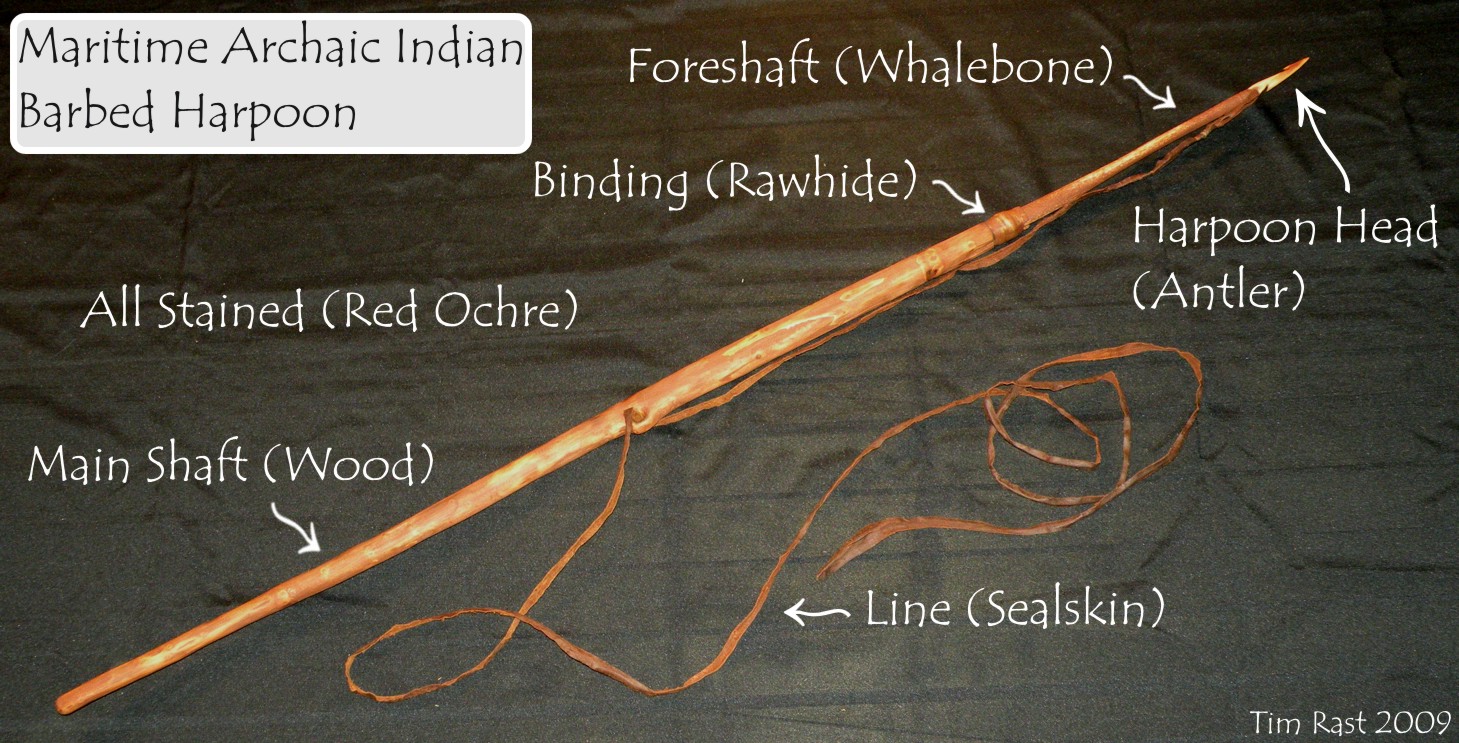
On the last two tests of the harpoon and gel, Lori and I took over 500 photos and videos. Many of those were action shots with 20 or 30 images making up a second or two of movement. Here's some that show things going wrong or almost working, like this mostly toggled harpoon head.


The video above is the closest we have to a showing a toggling harpoon head toggling. By this time in the experiments the gel had been stabbed 5 or 6 times and there was a pretty well defined channel running down the middle. The skin layer had also seperated and the entry hole had stretched, so the harpoon head started to back out of the hole while it was toggling. Then the camera stopped recording. In the end, the harpoon head did stay lodged, caught on one of the basal barbs and partially toggling beneath the skin.


This video illustrates two of the biggest problems with the current set-up; the wobbly target and my lousy aim. I like the size of the two litre pop bottle mold because it gives enough room for the harpoon heads to operate, but its a little too tall and skinny and is easy to knock off balance when my aim is perfectly perpendicular to the target surface. Something the size of an ice cream bucket might be more stable, but the gelatin gets opaque so fast that I think a lot of the interesting detail would be much less visible on the surface of a bigger block of gelatin. One idea to cut down on the wobble would be to find a more sturdy pop bottle sized clear container to build the model in. To help with the aiming, it might be necessary to use some sort of drill-press aparatus to guide the harpoon. That seems like less fun to me though.

Photo Credits: Lori White

Photo Captions:
Top Photo: Badly toggled harpoon head, which partially worked its way out the entry hole.
Top Video: The test strike that created the poorly toggled harpoon head in the top photo.
Bottom Video: A failed attempt with the barbed harpoon, bending and dislodging the harpoon head after breaking through the skin.

Friday, November 27, 2009

Elfshot Reproductions at the Rooms

When I dropped off the gift shop order at The Rooms on Sunday, Lori and I toured through the art gallery and museum. I snapped a couple photos of past work that is on display in the Museum.


I did these 3 Palaeoindian points to help illustrate the movement of the first people north into Newfoundland and Labrador.


This is a soapstone pot sitting on a lamp stand with a smaller soapstone lamp beneath it. I made this a few years ago for a different part of The Rooms, so it was a nice surprise to see that it had found its way into an exhibit space.

Wednesday, November 25, 2009

Hafted Necklaces

I'm off to Alberta to visit my dad and stepmom for a few days. I set up a few pre-scheduled posts to feed to the blog while I'm away. If I'm able to make updates while I'm at the farm, I will, but if not, I've got a few short photo based posts ready to go. Here's a look at the hafted point necklaces that I showed on the stalk last Friday. Now that I have a good recipe for a durable red ochre paint, I'm thinking about introducing hafted Beothuk style points as a new product for the wholesale season next spring. Imagine these, but done in local Newfoundland chert and stained with red ochre.


Hafted Necklaces (Obsidian, Wood, Artificial Sinew, Epoxy, leather cord) : $28.75 tax inc.

Photo Credits: Tim Rast

Photo Captions: Hafted Obsidian Necklaces

Monday, November 23, 2009

How does a Barbed Harpoon Work?

The oldest style of harpoon in the world is the barbed harpoon. A harpoon is a spear-like device with a detachable head tied to a line. When the barbed harpoon head is embedded in the flesh of the prey animal, the barbs grip the tissue and the hunter has a secure line attached to it. Its similar to how a fish hook catches a fish, but its used on larger fish and sea mammals. Sometimes the hunter holds the other end of the line and sometimes the line is attached to a float that drags behind the prey, identifying its location, preventing it from escaping and exhausting it.


In Newfoundland and Labrador, the Maritime Archaic Indians used barbed harpoons similar to the one labelled above. They most likely used it for seal hunting. This is my best guess for how the harpoon might have looked. If you visit the Maritime Archaic exhibit at The Rooms, you'll see this label next to the Maritime Archaic Indian foreshafts like the one in this reproduction: "Whalebone foreshafts were used for sea mammal hunting. Exactly how they functioned has puzzled archaeologists for decades." That's still totally true - take all the reproductions that you see on these pages with a grain of salt. I wasn't there.

However, in my kitchen, I did finally get all of the components of the ballistic gel seal working the way they should; skin, fat, and meat. For the meat layer, I tried denser ballistics gel alone, but it wouldn't hold the harpoon head securely enough when I tried to pull it out. Next I tried lacing the dense gel with sinew threads, but the barbs just grabbed them and pulled them out like spaghetti on a fork. Finally, Lori gave me some cheese cloth, which I cut into circles and suspended at various depths in the gelatin. The loose weave was punctured by the antler harpoon head, but there was enough form to the cloth that it held together and gripped the harpoon head when I tried to pull it out. I don't think I quite have a realistic muscle consistency, but by increasing the density of the gel and adding more and more cheesecloth layers I know I'll be able to have a lot of control over the accuracy of the model.

In the tests with the barbed harpoon, we got lucky with two different views of the barbs in action. On the first attempt, my bad aim and a wobbly gelatin tower caused the harpoon to go astray and not penetrate the "meat" layer. However, the barbs snagged securely on the rawhide skin layer. In the second photo below you can even see the path the harpoon head took through the gel before being pulled back up to snag on the skin.


On the next test, the harpoon penetrated deep into the "meat" layer and through 3 of the 4 layers of cheesecloth. The "meat" had enough substance to grip the barbs of the harpoon on the way out. It held firmly enough to prove the concept and get these photos, but in actual experiments I think I'll use a denser gelatin (in this version I used 1 packet of knox gelatin for every 100ml of water) and more layers of cheesecloth.


Its interesting to note that when the harpoon head grabbed on the skin layer it used the barb closest to the line hole and when it grabbed in the "meat" it used the barb closest to the tip. There is a lot of variability in Maritime Archaic harpoon heads of this style, with anywhere from 1 to 4 barbs along one edge or both edges. That would be another interesting thing to examine in these experiments - the differences in the number and arrangement of barbs on a barbed point.

I'm loving this project - if testing the ballistics gel is this much fun, I can't wait to start actually testing the harpoons!

Photo Captions:
First & Second: Tim Rast
Third - Eighth: Lori White

Photo Captions:
First: Labelled Maritime Archaic Barbed Harpoon
Second: Label next to Maritime Archaic foreshafts at The Rooms
Third: Ballistics Gel Seal test using barbed harpoon
Fourth: Barbed harpoon head grabbing the skin layer
Fifth: You can see the trackway of the harpoon preserved in the gel!
Sixth: The barbs grabbed the cheesecloth in the meat layer!
Seventh: Its the distal barb that is doing all the work.
Eighth: You can really see the cheesecloth gripping from this angle.

Friday, November 20, 2009

Filling Orders and Goldstone

I've been trying to wrap up some loose ends before heading to Alberta for a few days next week. The house clean-up has been proceeding slowly and I've been working on filling craft fair orders, preparing quotes and invoices for clients and throwing out some particularly rancid gelatin that was forgotten during the hectic craft fair weekend. The biggest block of time has gone into preparing a wholesale order for The Rooms Gift Shop. Hopefully it will be ready for delivery later today or (more likely) tomorrow. I can pull some of the order from pieces I prepared for the craft fair, but there is so much variety in the order that I need to make several pieces from scratch.

The arrowheads hafted onto shafts in the photo are going to be hafted necklaces. I drill a hole through the wood, cut the shaft off close to the arrowhead, and string them on leather cord. I'm using some particularly nice obsidian in these necklaces and 2 of them will be for sale at The Rooms Gift Shop shortly.

There will also be a few goldstone pieces in this order. Goldstone is a manufactured material that has copper flakes suspended in glass. The process was discovered in the 17th century and patented in Italy in 1670. The reason I use it is that there were several goldstone artifacts found in the excavations at Ferryland, including gold rings and pendants. The Ferryland artifacts appear to have been hidden in 1696 when the French attacked the site. I think its interesting that this material shows up in the New World within a couple decades of its being patented in Italy.

Photo Credits: Tim Rast

Photo Captions:
Top: Hafted Necklaces, still on the stalk
Bottom: Goldstone earrings and necklace, ready to be wired

Wednesday, November 18, 2009

What are the parts of a Toggling Harpoon?

Here's a quick look at the parts of a Dorset Palaeoeskimo toggling harpoon and some of the tests to find a good ballistics gel seal to do harpoon experiments with.


This style of harpoon is used to attach a line to a seal. The hunter gets close enough to the seal to jab it with the harpoon, the harpoon head detaches and toggles beneath the skin of the seal. The hole where the line attaches to a toggling harpoon is near the middle of the harpoon head, so when the seal tries to escape, the harpoon head toggles, or turns sideways. A toggled harpoon head is bigger than the hole it made going in and is firmly embedded in the hunters prey. The line is used to haul the seal out of the water so that the hunter can finish it off.

That toggling action is one of the things I'm trying to illustrate with the ballistics gel seal. This particular video still doesn't show the harpoon head toggling, but I did learn a lot from it. One thing it illustrates is that the skin and fat layer of the ballistics gel seal work very well. They offer the right amount of resistance and are good approximations of the outer layers of a seal. The Dorset Palaeoeskimo harpoon heads from Newfoundland that I have modelled this harpoon on have a single line hole, and I believe that the line must have been secured to the harpoon head with a big knot of sinew on one side. On the test in the video, the sinew knot bulged out of the smooth contour of the harpoon head. It created a raised bump a couple millimetres high, but it was enough to snag on the rawhide skin. The resistance from that tiny snag was enough that the harpoon was bound up and the whalebone foreshaft broke. I learned two things. First, if I'm going to use a sinew knot to secure the line, it needs to be flush with the surface of the harpoon head and secondly, the forces involved in the experiment are great enough that things break when they go wrong. Which is also good, because examining how things break is very useful information when studying broken and discarded tools in the archaeological record.


After the foreshaft broke, I pushed the harpoon head down into the gel manually and it did toggle for me when I pulled on the line. In the photo below, you can see the gel tube suspended from the toggled harpoon head and line. The gel is still a little opaque to see everything that's going on, but you can make out a few interesting details. In the overhead shot, you can see the hole that the endblade made and the shadow of the harpoon head lying beneath the rawhide skin. In the inset shot you can see the endblade, which detached when the harpoon head toggled. It marks the depth that the toggling occurred, although the harpoon head itself squished up through the ballistics gel "fat" layer and is actually snagged just below the skin. You can see the rubbery rawhide skin flexing upward under the tension.
Photo Credits:
First, Second: Tim Rast
Video: Lori White
Third, Fourth Photo: Lori White

Photo Credits:
First: Labelled parts of a Middle Dorset Harpoon Reproduction, Elfshot 2009
Second: Showing the detached harpoon head
Third: Detail of video frame showing the sinew knot in the harpoon head line hole when it grabbed the raw hide.
Video: Testing the ballistics gel. The foreshaft breaks when the harpoon head snags on a knot in the sinew
Fourth: The harpoon head toggling in the Ballistics gel.

Monday, November 16, 2009

Craft Fair Recovery

The Fine Craft and Design fair went very well. My sales were on par with previous years at the Convention Centre, which I take as a big success, given the move to a new venue, the new 10-day format, the recession, and H1N1. There were lots of reasons to expect things to be down this year, but they weren't. The Arts and Culture Centre had a great atmosphere and I didn't hear from a single customer or exhibitor who didn't like the new location. I saw lots of old friends and met lots of new people. We even did a little shopping ourselves -- including this great hand forged pot rack from Green Family Forge.

One trend that was strong this year was an interest in flintknapping workshops. There was enough interest that I'm planning to do two workshops early in the new year, one on pressure flaking and one on percussion knapping. I'll post more details as they get worked out, but for now, if you are in the St. John's area and interested in learning to knap, send me an e-mail and I'll keep you posted.

Today is a bit of a slow day. The 12 hour days at the fair are long. I find it to be a big shock going from the isolation of the workshop in the weeks leading up to the fair to being immersed in crowds of Christmas shoppers for 5 days straight.

I'll slowly start re-assembling the house today. There's always a mess to clean up in the house after a craft fair because everything else leading up to the fair takes a back seat. This year the problem was compounded by the fact that Lori was sick in bed for the week and a half leading up to the fair. I was left unsupervised during that entire time and the craft fair preparation crept into every nook and cranny of the house.

Photo Credits:
First, Second: Tim Rast
Third: Lori White
Fourth, Fifth: Tim Rast

Photo Captions:
First: Elfshot Booth at 2009 Fine Craft and Design Fair
Second: Green Family Forge Pot Rack
Third: Beer Bottle to Arrowhead Workshop
Fourth, Fifth: The state of our house this morning.

Friday, November 13, 2009

Only Three Days Left!

So far, the Fine Craft and Design Fair at the Arts and Culture Centre in St. John's has been fantastic! I'm loving the new venue and there were actually artisans in the first fair who enjoyed themselves so much during the first 5 days that they signed up to do it all over again at this week's fair!

The fair is Open 10AM to 10PM on Friday and Saturday and 10AM to 6PM on Sunday. Free Parking and Admission.

Don't forget the Flintknapping demonstration - Saturday, November 14th, 10AM to 12 Noon. Hope to see you there!


Photo Credits: Tim Rast

Photo Captions:
All: The Elfshot Booth (#512) at the 2009 Fine Craft and Design Fair

Wednesday, November 11, 2009

Remembering

When I think about Remembrance Day, I think about my dad's dad, Gustav Rast. He enlisted with the Polish army in World War I. At the time it was a good opportunity for a young man. He joined because they would send regular pay back to his family. Although living in Poland, grandpa was German and his brothers joined the German army, but grandpa didn't like how strict the Germans were so he joined the Polish forces instead. However, the fighting didn't end for Gustav when the Great War ended in 1918. Poland found itself an occupied country and grandpa continued fighting against the Bolsheviks between 1918 and 1921 for Poland's Independence from Russia.

Even when the fighting was over and Grandpa sold his team of horses for passage on a ship to Canada in the 1920s the war never left him. After a year of saving, he sent money back to Poland to bring his young wife and 3 small children (they had five more later) over to Saskatchewan. He exchanged letters for many years with his brothers who continued to live in Germany after the War, but when World War II broke out Grandpa destroyed all those correspondences. Grandpa didn't talk to his kids about his experiences in the First World War at that time, that would come later.

During World War II grandpa became very paranoid. German immigrants in Canada weren't allowed to own guns. Grandpa had a .22 rifle that he used for hunting rabbits to feed the family. He wrapped it in tar paper and took it out on to the prairie to hide in a rock pile until after the war. His oldest son, Erwin, followed grandpa to see where the gun was hidden. Erwin would have been 12 or 13 and he took his seven or eight year old brother Otto out to the rock pile to show him the gun. Erwin convinced Otto that since he knew where the gun was now he would get in trouble if his parents ever found out that Erwin was sneaking out and playing with it. Eventually Erwin broke the gun and threw it away. When grandpa went to retrieve the .22 after the war and found it missing he spent years wondering who found it and was convinced that the government was watching him. Erwin died in a car accident when he was still a teen and Otto didn't want to tarnish his memory with his father so he never told Gustav the truth about the rifle.

Grandpa didn't talk about the war until much later, but he spoke of it often after my grandma died. My earliest memories of my grandpa are of him sitting at his kitchen table in Saskatchewan talking to my dad in English and German about the War. It was over 60 years later and those memories were still right on the surface for him. He talked a lot about his friends and how random it was between who lived and who died. He'd say over and over again "Where was my bullet? So many good boys got killed... where was my bullet?" In fact, he was shot on at least one occasion and he could recall listening to the two Russian soldiers standing over him debating whether or not to shoot him again. They decided to leave him there. Grandpa could understand Russian and he heard one soldier convince the other not to waste a bullet, because this one would die anyway. On that occasion the Red Cross found young Gustav and patched him up. But thinking back, grandpa carried all those wounds in his head for the rest of his life. He dwelled on all his friends being lost and the many times he was held as a prisoner of war.

On my mom's side, she lost an uncle, Leonard Johnson, in World War II. He was an observer on board an RCAF bomber and went missing on July 29, 1943 in a raid over Hamburg. Like so many Canadian families, my mom's family were left wondering for decades whatever happened to him. In the family portrait on the left, Ragna was my grandma. Leonard was missing for years, although his grave has been located since. I believe he's buried in the Netherlands. Maybe someone in my family reading this could help fill in more details on my Great-Uncle Leonard.

Edit: Leonard is buried in the British Cemetery in Hamburg, Germany.

Photo Credits:
First-Third: Family Photos
Bottom: Family Photos from Mabel Johnson's self published memoir "Yesterday Remembered"

Photo Captions:
First: Gustav Rast, my grandpa. The photo has the following caption handwritten in ink on the back: 1919 G Rast awarded the bravery award for occupying the city of Litau by Poland's army at Easter
Second: Grandma Eva and children, Erma, Otto, and Frieda in Canada 1930/31
Third: Grandpa and his friends. Grandpa is seated in the middle
Bottom: My Great Uncle Leonard Johnson, and Leonard with his siblings and parents.

Monday, November 9, 2009

Fair and Ballistic Gel Seal Anticipation Builds!

I needed to pick up some shelves and other display items for my craft fair booth yesterday and had a chance to briefly stop by the Fine Craft and Design Fair to check out the show and my booth space. This was my first time visiting the fair in the Arts and Culture Centre and I'm really excited now about joining the fair this week. The place was hopping! At 10 days, the fair is twice as long as it has ever been and the layout and auxiliary events create a big festive atmosphere. The Craft Fair fits into the space so well, that its almost like a new mall dedicated to craft has sprung up in the middle of St. John's. The show is closed Monday and Tuesday to switch over booths and re-opens on Wednesday November 11th at 4:00pm with a new set of craft producers.

But of course, the inside of my head still looks something like this:

(You can make make your own Wordle at Wordle.Net!)

I spent more time working on the ballistics gel seal model. The current version is the 3 layer pop bottle seal. There is a rawhide skin layer, the smooshy fat layer and the sinew laced meat layer. I cut the top end off the two litre pop bottle and used it for a funnel so that I could cut a relatively small hole in the bottom to fill it from. I stretched a wet rawhide skin from a soaked chew toy for dogs over the top, like a drum skin. I flipped it over and filled it up upside down. The initial gelatin pour seeped through the wet rawhide. It was kind of messy, but in the end it helped keep the rawhide rubbery and more skin like when the gelatin set. I used 5 packs of Knox gelatin for 700 ml of water for the fat layer. I did that twice, so 10 packs for 1400 ml of water would be the same thing. For the meat layer I used 7 packs for 700 ml of water and poured it in 3 stages. Between each stage I let it gel slightly and sprinkled soaked sinew strips into the mix. That gives me about 4 inches of "fat" and 2 inches of "meat".

That's as far as I've got. I'll know later today if they work and what changes need to be made.

Photo Credits:
Top, Tim Rast
Second, Wordle.Net
Third & Fourth, Tim Rast

Photo Captions:
Top, Earrings ready for the 2009 Fine Craft and Design Fair, St. John's
Second, Wordle created using the text from the past week's blog posts
Third, Filling the ballistic gel seal. If you expand the photo you can see the sinew in the "meat" layer.
Fourth, Ready to test!

Friday, November 6, 2009

Craft Fair Update

Its been a hectic week of preparation for my run in the Fine Craft and Design Fair at the Arts and Culture Centre in St. John's next week. I've ran into a couple of people who said that they thought the fair was this week. It is, but I won't be there until next week. It runs for 5 days this week and 5 days next week, for a total of 10 days. There are a dozen or more exhibitors attending for the full 10 days and 60 or so exhibitors attending either the first 5 days (Nov 4-8) or the last 5 days (Nov 11-15). You can see the full list of craft producers and the days they'll be attending here.

Elfshot will be there for November 11-15th, and I'll be demonstrating flintknapping on Saturday November 14th for two hours starting at 10AM.

The reason for the move to the Arts and Culture Centre is the Convention Centre downtown kept raising their prices on us. Every year we had to pay more and it was impossible for the Craft Council to break even on the event. There is no comparable sized venue in St. John's. We needed a place with room for 70-100 booths. We picked the Arts and Culture Centre, for a lot of reasons, but the smaller floor space meant that we needed to create two back to back fairs to fit in all the booth holders.

There are some really big benefits to the Arts and Culture Centre for everyone. One is the parking - there are hundreds of free parking spaces, which was a big issue for a lot of people at the downtown location. Since its a public space and so much cheaper for us to rent than the Convention Centre, the admission is free. You can come as often as you want and it won't cost you anything. Although, if you are in the Christmas Spirit, the Craft Council of Newfoundland and Labrador has partnered with the CBC and the Community Food Sharing Association and there will be locations for donating non-perishable food items or cash at the door.

Photo Credits:
Top: Tim Rast
Middle: From the Arts and Culture Centre Website
Bottom: Tim Rast

Photo Captions:
Top: Lost Stone Obsidian Necklace and Earrings ready for the show!
Middle: The Arts and Culture Centre in St. John's
Bottom: More Lost Stone Obsidian

Wednesday, November 4, 2009

Harpoon Foreshafts and Gelatin Seals

Between the leftover Halloween candy and visions of giant gummy seals I hardly slept at all last night. I've been thinking a lot more about the ballistic gel seal idea.

I think that in order to properly test both barbed and toggling harpoons the gel seal would have to have three layers. Skin, blubber, and meat. I think rawhide would work for the skin layer, and two layers of gel could serve as the blubber and meat layers. The meat layer would be a dense ballistic gel and the blubber layer would be a gel made with more water, so it would be a little squishier. If you aren't squeamish, you can see the layers that make up a seal here: culture camp how to butcher a seal demo.

I've been using Knox Gelatine (its spelled that way on the box) to make the ballistics gel. To make edible gelatin, the recipe is one packet of Knox's for 500 ml of water. I'm using about 700 ml of water and in the first batch I used 2 packets of Knox. This made jello. All it was missing was the sugar and the floating peas and chunks of ham. I remelted the gelatin by floating the tupperware in a sink full of hot water and mixed in a third pack of Knox. The 3 pack-700ml gelatin block is the one I used in these photos. It held together a little better although it still failed (the third picture in the triptych below). It might make an ok fat layer, but I think its still softer than any real animal fat. I'm melting it down again and I'll add a fourth pack. My guess now is that 4 packs of gelatin will make an alright fat layer and that I'll need at least 5 or 6 packs to the same volume of water to make a dense enough muscle layer.


One thing that this avenue of thinking has illustrated for me is the functional difference between the long foreshaft on the barbed harpoon and the short foreshaft on the toggling harpoon. They start to make sense if you think of a seal in three layers, with skin and fat near the surface and meat somewhere deep inside. The toggling harpoon head works in the fat near the skin while the barbed harpoon needs to grip the denser muscle tissue deep inside the animal. The different lengths of the foreshafts would deliver the harpoon heads to the appropriate depths inside the seal.

The harpoon reproductions on the left are two different cultures, and all of the tools made by the Palaeoeskimos were smaller than the Maritime Archaic equivelant, so its kind of like comparing apples and oranges. However, the Maritime Archaic Indians also made toggling harpoons, and the foreshafts for those are much shorter than the foreshafts on the barbed points. One recovered at Port au Choix with the Maritime Archaic toggling harpoon head still attached was only 18 cm long. Out of context, it could have passed for a large Palaeoeskimo foreshaft (the foreshaft in my Palaeoeskimo reproduction is 12 cm long). The Maritime Archaic made both barbed and toggling harpoon heads and they made both long and short foreshafts, which makes sense when you consider where each of these kinds of harpoon heads would work best inside the body of the marine mammals they were hunting.

Maybe an experiment built around foreshaft lengths would be a good excuse for stabbing blocks of ballistic gel with harpoons. I'm thinking about other tests involving barbed versus toggling harpoons and stone endblades versus self-bladed harpoon heads. Thank you everyone for commenting on the last post - keep the ideas coming.

Photo Credits:
First, Third, Fifth: Lori White
Second, Fourth: Tim Rast

Photo Captions:
First, Stabbing a gelatin block with a barbed harpoon head
Second, Knox' gelatin and the container of gel
Third, Stabbing rawhide and gel with a Dorset harpoon. The glass is there to give the harpoon head room to toggle, but it didn't happen.
Fourth, Maritime Archaic barbed harpoon, top, and Dorset Palaeoeskimo toggling harpoon, below
Fifth, still stabbing gelatin

Monday, November 2, 2009

Jewelry and Harpoon Head Ideas

Its a jewelry week here. I'll be focusing on glass, chert, and fibre optic glass. I have bags of points that I keep on hand for emergencies. I don't have a lot of time before the craft fair, so I'll try to avoid starting pieces from scratch and focus on what I already have that is ready to be assembled.

On the other side of the coin, Elfshot is in great shape for artifact reproductions and original knives. I don't usually have this many artifact reproductions on hand so I'm looking forward to seeing how the craft fair display will go together. I have two harpoons ready to go, one is Dorset Palaeoeskimo and the other is a Maritime Archaic Indian style, just waiting for a red ochre application. I put a braided line on the Maritime Archaic harpoon because I liked John's idea so much. The 4 strand round braid takes the relatively thin harp seal leather and turns it into a pliable strong rope. I still wish I could find some good strong bearded seal skin, but the braided line does look nice.

I don't often have extra harpoons around the house either, so I feel like I'd like to do a little extra photography with them. Its especially interesting because they are so different, the Maritime Archaic Harpoon is a self-bladed barbed point while the Dorset Palaeoeskimo harpoon has a stone endblade fitted into a toggling harpoon head. This would be a good opportunity to illustrate the differences in how they work. Thanks to Mythbuster's the internet is full of recipes for homemade ballistics gel. I think I'll make some and stab it. If I have some successful experiments I'll post pictures.

Photo Credits: Tim Rast

Photo Captions:
Top: Red glass points ready for jewelry.
Middle: Maritime Archaic indian harpoon head and braided line, around a Dorset Palaeoeskimo harpoon head and line
Bottom: Dorset Palaeoeskimo Harpoon Head (left) and Maritime Archaic Indian Harpoon Head (right)
Related Posts with Thumbnails