Friday, July 31, 2009

Back in the Trenches

After the visit to the Rooms at the start of the week, most of my work on the Parks contract has been sourcing raw materials and background reading on bows and bowmaking.

My main focus for the week has swung back to one final wholesale order for a shop in Gros Morne and Craft Council meetings. I had a shop meeting on Wednesday afternoon and a board meeting on Thursday morning. This is the end of the first quarter of the fiscal year so it was a lot of money talk. We're using a new method for budgeting which makes it easier for us to plan ahead for the rest of the year, rather than just wondering over what has already happened.

With the wholesale order, I'd like to get it out the door before Monday. I'm anxious to get back to the Parks reproductions and the more work I get done on the wholesale order today the less I'll need to do over the weekend. I have a handfull of points to finish in the workshop and a bit of assembly work to do in the basement.

Until Monday, here's some Elfshot content that might interest you. A pair of a 2005 articles in .pdf format by Alaric Hall; the first from the Journal Folklore called, Getting Shot of Elves: Healing, Witchcraft, and Faeries in the Scottish Witchcraft Trials and a second from Neuphilologische Mitteilungen: Bulletin of the Modern Language Society called, Calling the shots: the Old English remedy gif hors ofscoten sie and Anglo-Saxon "elf-shot".

Photo Credits:
Top, Janet Michel
Middle & Bottom, Tim Rast

Photo Captions:
Top, Chuck and Tim and the Tuktut Nogait Bow
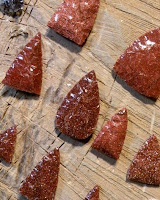
Middle, Goldstone points, ready to notch
Bottom, Fibre Optic Necklaces ready for Java Jack's, Rocky Harbour

Wednesday, July 29, 2009

Tuktut Nogait Bow Makes A Great First Impression!

One of the reproductions that I'm most excited about making this summer is a bow from Tuktut Nogait National Park in the Northwest Territories. On Monday, Chuck Szuch and I examined the bow. This was my first good look at it and having Chuck there, with his decades of archery experience, made for a very informative session.

The wood was identified as Pacific or Western Yew, which, as the name implies, isn't native to the Atlantic or the East, where I live. I have two yew staves en route to St. John's. My plan is to use one stave to make the reproductions for Parks Canada and to use the second stave to make myself a functional bow.

The bow is in two pieces, with a join in the middle of one limb. I couldn't quite understand how a join would work in the middle of a limb like that - it seems like a weakness in the part of the bow that is put under the most stress. But Chuck helped me through the science of how a bow works and the trick here is that this would have been a composite bow with a cable of sinew strung along the back. When you draw a bow it bends into a "C" shape - the outside of the C is stretched and the inside of the C is compressed. In this style of bow the sinew cable runs along the back of the bow and is the part that is stretched, while the wooden body of the bow is compressed. The design of the bow actually pushes the join in the limb together when it is drawn.

(Click to enlarge)

Its a fairly short and slight bow with recurved limbs, about 120 cm long, although there is damage to both ends and the string nocks are missing. The cable backing of sinew would have run the length of the bow back and been tied to the wood, rather than glued down like other sinew backed bows. The cable is twisted to provide tension. The join between the two pieces of wood is on the shorter (lower?) limb at the elbow where the recurve takes place. The lashing for the cable backing is especially thick at this point on most bows, so in this case it would not only fix the cable to the back of the bow, but it would help join the two pieces of the bow together.

(Click to enlarge, the slightly thicker part in the middle of the bow is the grip)

Its still early days for reasearching this bow, but it was great to have Chuck's input at this early stage on the principles of archery. I need to do more research on bows from the Western Arctic - so far most of the cable backed bows I've seen have been much thicker and heavier than the Tuktut Nogait bow. Perhaps that's the result of being forced to use less than ideal wood, usually driftwood, to make bows from. The Tuktut Nogait bow is made from Pacific Yew, which is an excellent bow wood, so maybe that is how they were able to craft such a fine bow.

Here's an interesting article by Dick Baugh that explains some of the process of building a cable-backed bow, called A Cordage Backed Bow.

Photo Credits: Tim Rast

Photo Captions:
Top: Chuck examines the Tuktut Nogait bow
Second: Detail of the join in the limb
Third: Back view of the bow
Fourth: Profile of the bow

Monday, July 27, 2009

Tely10 Run and Family Visit

Yesterday, I ran the Tely10 for the first time. My goal this year was just to finish the race and I did it! The clock said one hour and 34 minutes when I crossed the finish line, I was somewhere around 1400 out of 2600 runners. The official times will be posted soon and I'll update this post with my times. (posted here) With so many runners, I started near the back of the pack. It was a wet day and the start line was slippery so it took a while before I got to the official starting point of the race after the gun went. But everyone wore a little chip on our shoes that activated when we crossed the start line and recorded our time when we crossed the finish line. So everyone actually has two race times, a Gun Time that records when we crossed the finish line from the time the gun shot went and the Chip Time that records the time it took us to run the distance from the start line to the finish line.

Tim's Gun Time: 1:34:55
Tim's Chip Time: 1:33:26

Overall, I'm very happy - the training schedule provided on the Tely10 website did a fantastic job of preparing me for the race. Advice from friends helped alleviate the last minute nerves and gave me lots of good strategy points for different sections of the course. I'm stiff today in my legs and between my shoulders, but I think a short run later today will shake that loose again. I like the Tely10 training schedule so much that I'm starting it over again to lead up to The Run for the Cure in October. That's a 5k fun run to raise money for Breast Cancer research and one that myself and a group of friends have participated in for many years.

On Friday, my Aunt Janet and her man Chuck arrived in St. John's. They've been doing a lot of travelling over the past couple of years in their fifth wheel. This summer they drove from Calgary to Philedelphia to visit Chuck's son and while they were in the neighborhood, they swung through Atlantic Canada and came to Newfoundland. Its been great having them around, we did Signal Hill and Cape Spear on Friday and made a trip down to Ferryland on Saturday. Sunday was downtown St. John's and out to Portugal Cove-St. Phillip's for fish and chips.

It turns out Chuck is an archery instructor, and one of the Parks reproductions I'm working on is a yew bow in two pieces. We're going down to The Rooms this morning to look at the bow, I think he'll be able to see things on it that I'd be oblivious too, so I'm really looking forward to that. Its also nice to have family see what I do. Sometimes I have a difficult job explaining what exactly I do to make a living.

Photo Credits:
Top: Lori White
Middle & Bottom: Tim Rast

Photo Captions:
Top:Tely10 Raceday
Middle: Aunt Janet at the garden in Ferryland
Bottom: Chuck, Lori, and Janet at Cape Spear

2017 Gun Time: 1:44:30
2017 Chip Time: 1:41:38

Friday, July 24, 2009

Canadian Tire makes shopping at Kent easy!

The part I needed replaced to connect the angle grinder attachment to my Mastercraft spin saw, purchased at Canadian Tire. Even though its a part that is designed to wear out and be replaced, it isn't sold in Canadian Tire stores, so you need to call their 1-800 warranty hotline.

The first replacement part that Mastercraft's Warranty hotline sent me.

The second replacement part that Mastercraft's Warranty hotline sent me.

My new angle grinder, purchased at Kent.

Wednesday, July 22, 2009

Patinating Copper Experiments

I've been plugging away on the reproductions for Parks and working on one last wholesale order this week. Its not a huge wholesale order, but I have almost no product on hand so I'm pretty much starting from scratch on it.

Here's an update on the copper patina experiments. I've been testing different combinations of Red Wine Vinegar, Sea Salt, Miracle Gro and water on heavy copper ground wire. The vinegar and salt combinations tend to give a nice green patina although the crystals grow fairly large on the surface. They can be brushed off fairly easily, but I'd prefer if they didn't grow so big in the first place. I start with a tablespoon or so of vinegar and stir in as much salt as the solution will hold, a teaspoon or more. I've read that the more salt in the solution, the more green the patina will be and also that Red Wine Vinegar is the prefered vinegar to use.

Miracle Gro brings ammonia into the mix, which also reacts with copper to produce a patina, although it creates a more bluish colour. Miracle Gro mixed with water creates a nice blue patina. I don't think its a good match for the artifact I'm trying to reproduce, but its an interesting look. Personally, I'm happiest with the Red Wine Vinegar and Miracle Gro solution. I mixed the solid miracle gro pellets into a tablespoon of vinegar, the same way I did with the salt. The resulting patina is a blue-green mix, but without the heavy crystal growth. It creates a nice dusty patina.

I also tried lightly sprinkling the copper with the mixture and completely submerging it in the salt and vinegar mix. The light sprinkling was definately the better way to go. By the time the vinnegar all evaporated, the salt crystals that grew on the submerged copper were huge (photo to the left). Not much use to me.

When I visit the artifacts at The Rooms tomorrow, I'll take my samples with me and see which treatment gives the closest match to the patina on the copper awl.

One final note, the green crystals that form on the copper and the plate are called verdigris. Its one of the original sources of green pigment used in painting. I'll save it and use it on another reproduction. There is a bent wood piece that I think may be a kayak rib with some green staining on it. The verdigris will be a good colour match for that stain on the reproduction.


(Above) Red Wine Vinegar and Sea Salt Patina on Copper after 5 days. Most of the growth happened within the first 24 hours. Note the big crystals.

(Above) Miracle Gro and water patina growth on copper. 3 Days growth. Decent growth, but I think its going to be too blue.


(Above) Miracle Gro and Red Wine Vinegar patina on copper after 3 days. This is the recipe that I'm pulling for. I have to do a side by side comparison with the artifact, but the colour and crystal size all look pretty good to me.

Photo Credits: Tim Rast

Photo Captions:
Top: Raw copper wire used in the experiments
Second: Photo of Ingredients and trays with on-going experiments
Third-Six: Results photos.

Monday, July 20, 2009

Nerves Build as Tely10 Training Enters Final Week

This is the last week leading up to the Tely 10 Mile Road Race next Sunday. I'm confident about finishing, but I'm starting to get nerves. I've only ever done 5k fun runs in the past and I made the mistake of looking at last year's times and comparing them to my guestimated runtime. My guess right now is that I'll be somewhere in the 1:45-2:15 time range. Which will put me solidly in the back of the pack. There are over 2000 people registered right now, which is a lot of people and in order to finish in the top half you'd need to run the 10 miles in about 90 minutes or less. That might be a good goal for next year, but its out of my reach for this Sunday. I need to focus on finishing and not worry about the time - whatever time I get will be a personal best and the slower it is the easier it will be to beat next year.

The race starts at 8am, but I usually run in the evenings, so starting yesterday, I've switched my runs from evenings to the mornings. I need to adjust to running earlier in the day as well as getting up a couple hours earlier. Of the four scheduled runs each week, I've been doing two of them on the treadmill. I started to feel the impact of running on the road on my knee, and the shock absorbing treadmill track does a lot to help that. After a couple weeks of half road/half treadmill runs the pressure in my knee is gone.

I have family coming to town from Friday to Sunday, which is great, but I'm a little worried that I'm not going to be able to spend a lot of time with them because I need to go to bed and get up early on the weekend. I'm not sure if they'll understand why I want to go to bed at 9:30 on Saturday night so I can get up at 5:30 on Sunday morning so I can place 1750th in a race with 2000 people.

Photo Credits: Tim Rast

Photo Captions: Scenes from a treadmill. No wonder people run outdoors.

Friday, July 17, 2009

Back from the Lab

Its been a pretty busy week and I'm anxious to get back into the workshop today. After a morning Human Resources meeting (staff job review) at the Craft Council, I went down to the Archaeology and Ethnology Lab at The Rooms in the afternoon to check out the Inuvialuit artifacts on Wednesday afternoon. These are the pieces that Parks Canada is having me reproduce so that the original artifacts won't get damaged.

I took in the pieces that I've started and made some side by side comparisons and measurements. Most of the work is reductive... I start with a big piece of bone, wood, stone, or antler and carve or cut away pieces. Mistakes are costly, since I don't usually have a means to make things bigger if I accidentally work the piece too quickly and it becomes too small. So during the duration of the project I'll be working on many of the reproductions simultaneously, doing small amounts of work and checking them against the originals weekly.

For the larger wood pieces I have a few new additions to my workshop. I bought a small vice and spokeshave at Canadian Tire and a draw knife and set of sawhorse brackets from Lee Valley. I made a little bowyers bench to hold the wood while I plane it.

Finally, here's a quick look at the copper awl I started earlier in the week. The artifact is on the top and my folded and hammered copper reproduction is below. For a first comparison, I'm happy. Its on the right track and the overall look is good. I need to work on the cross section a little, its square now, but needs to be a little flatter and lozenge shaped. At this point its a pretty accurate snapshot of what the awl would have looked like when its maker was using it. Now my job is to antique the fresh awl so that it looks like a worn tool that was broken and discarded and then later found and preserved. I need to break off part of one end to get the length right and then work on the green patina. Fortunately copper is a pretty reactive metal and there are some acids and salts in the kitchen and pantry that should give me the patina I need. I'll post final photos and let you know what I used to antique the piece when its done.

See you on Monday!

Photo Credits: Tim Rast

Photo Captions:
Top: Sawing wood in the workshop
Second: Net Gauge. A tool that would have been used to measure the holes while making a net.
Third: Tim using a draw knife to plane wood.
Bottom: The Copper awl artifact and reproduction in progress.

Wednesday, July 15, 2009

Demonstration Day

I'm doing a flintknapping demo at Devon House from 3-5pm today. I'll be working Ramah Chert again, so it should be fun. This is the last demonstration that I have on my calendar, so if you are curious about how people used stone and antler to create sharp tools out of rock, now's your chance. Its free!

Flintknapping Demonstration
3-5 PM

July 15th, 2009

Devon House, Craft Council of Newfoundland and Labrador
59 Duckworth St.
, St. John's *map*

Photo Credit: Tim Rast

Photo Caption: My percussion knapping kit - a granite hammerstone and antler billets.

Monday, July 13, 2009

Parks Update - Copper

I need to make some progress on the Parks contract this week. So far I've mostly been sourcing raw materials, like the Pacific Yew that I'll need for a bow and the quartzite I'll need for a few flake tools and scrapers. I did do a bit of wood working last week, but I'm waiting on a few new tools and some replacement parts for other tools that will speed things up alot.

Today I'm going to work on a copper awl. The awl is tiny and was probably cold hammered out of native copper. I have all the materials and tools on hand to hammer copper. Native copper and meteoritic iron have been cold hammered into tools in the arctic for at least 1000 years. Hammering will make the copper hard and brittle and so periodically you need to heat it to anneal the copper and repair the microscopic cracks that form and soften it to continue hammering. It looks like this awl was made from a flat sheet of copper that was folded and pounded into an awl with a square cross section. I'll need to make the replica in the same way in order to get the same cross section and flakey surface texture. The tricky part will be getting the point. Imagine rolling up a sheet of tinfoil and hitting it with a hammer -- it wants to squash apart into sheets rather than pinch together into a point.

In 1994, I conducted a metal detector survey on Late Dorset Palaeoeskimo sites on Little Cornwallis Island, Northwest Territories (now Nunavut). I wrote my honours thesis on the results and I was just flipping through my thesis this morning - very science-y. The sites date to within a couple centuries on either side of AD 1000. We found dozens of copper and iron artifacts throughout the site - many times more than we were expecting. The metal detector was a pretty low tech machine that we bought at Radio Shack, and it had two settings "Trash" and "Treasure". Because copper is a better conductor than iron, those settings could distinguish between the "Trash" iron and the "Treasure" copper.

Photo Credits:
Top, Middle: Tim Rast
Bottom: Jen Carroll

Photo Captions:
Top: Copper Awl - artifact to be reproduced
Middle: Annealling the a hammered sheet of copper on its way to becoming an awl
Bottom: Tim Rast surveying an archaeological site in the High Arctic with a metal detector. (I really need to get a new slide scanner - these scans don't do the photos justice.)

Friday, July 10, 2009

Anachronistic Careers

I've had a couple late nights this week and realized that I was conditioned from a very young age to be self-employed in an anachronistic career. I was up late on Tuesday night and turned on the Calgary Stampede's Chuckwagon Races, and I've been hooked ever since. Its an evening event in Calgary, so with the time difference in St. John's, I watch it from 11:30pm-1:00am. Tonight is the last night of the qualifying rounds and this year they've introduced a pair of semi-final races on Saturday night and, of course, the big race for the top prize money is on Sunday night.

When I was young, my dad helped train a neighbor's chuckwagon team in the spring, so I can remember visiting his farm and making a couple trips to the barns at the Stampede. For the most part, my dad couldn't understand sports. He thought that if someone had enough energy to chase a puck or a ball, then they should be doing something useful, like stack bales of hay or shovel grain. Since there's plenty of that to do in the barns at the wagon races, it was an acceptable sport in our house. Its also a fairly honest sport. The outfits are racing for money and they don't try to hide it with cups or trophies or pennants. They do get belt buckles and trucks and bronze statues for winning, but they still talk about those in dollar amounts. I suppose its like golf that way, although golf would only qualify as a sport on our farm if they let the grass grow high enough that you could bale it into greenfeed once in a while. I can remember using a ditch next to a golf course once to unload horses and one of them getting away. It ran over a couple of greens and the only way dad could catch it was to get on another horse and go after it, punching more holes in the golf course. One of my teachers was golfing at the time. I think that incident is probably reflected on my report card somewhere.

Anyhow, if there's a point to this post, I was intending to illustrate the things that I learned from my dad that I apply to my work today. I learned on the farm that its possible to making a living by being self-employed, and that you don't need to let the century that you were born in limit you when looking for career options. And don't unload horses on to a golf course... if there's anybody watching.
Photo Credits:
Top, Middle: Tim Rast
Bottom: Doris Rast

Photo Captions:
Top: Chuckwagon Races at the Calgary Stampede in the early 1980s
Middle: Wendel Eresman and his training wagon on his farm, ca. 1980
Bottom: Branding day on our farm. Usually we just run the calves into the chute and brand them there, but we had family from the city visiting and they wanted to hold the calf down like they do on TV. I'm handing my dad an iron and keeping an eye on the other irons in the stove. Ca. 1980, but everyone's secretly imagining that its 1880.

Wednesday, July 8, 2009

Maritime Archaic Indian Bird Headed Combs

The Maritime Archaic Indians buried their dead at Port au Choix 4400-3300 years ago, while the pyramids were being built in Egypt. I've talked about the bird headed pins that were found at this site in previous posts, but there were also bird headed combs found in the excavations.

Here are a few that I made this spring. The combs are made from shed Caribou antler, given to me by a friend from Labrador. The Maritime Archaic Indians used a lot of red ochre in their burials, which lead to them being called the Red Paint People.

The antler gave these combs a very warm creamy colour and I was reluctant to cover it up with the ochre, but in this case the ochre staining is part of making an accurate reproduction. To apply the ochre, I have a couple handfuls of ochre in a plastic tub and mix in a cup of water. I add the finished bone or antler pieces to be stained to the tub, put the lid on and shake it all about. I find that method fills in the gaps between the teeth better than trying to paint the ochre on. I also like the way the ochre looks when it dries, you can see that its a dusty earth pigment, which I feel adds to the look of the reproduction. The water is a temporary medium that allows good coverage by the ochre, but that doesn't stick around like an oil base would. To keep the ochre on the piece and off your hair or fingers I'll spray on several coats of a clear finish.
Elfshot Reproduction Maritime Archaic Indian Combs & Pin
Clockwise from left,
Antler Comb, Small (Antler, Red Ochre) $51.75 tax inc

Antler Comb, Large (Antler, Red Ochre) $69.00 tax inc
Bone Pin (Bone, Red Ochre, Sealskin Barrette, not shown) $25.88 tax inc

Photo Credits: Tim Rast

Photo Caption:
Top: Natural coloured antler and bone goes into the red ochre tub.
Middle: The water evaporates leaving a coating of ochre on all the carved surfaces.
Bottom: Finished bone and antler reproductions.

Monday, July 6, 2009

Red Ochre

Stephen Eli Harris over at the Newfoundland and Labrador Blogroll named this site as the Blog of the Week for July 5-11, 2009. A blogroll is a collection of themed blogs that can be displayed as a list on your side bar. In this case the theme is our Province and you can check out other sites from Newfoundland and Labrador by scrolling down this page until you spot the NL flag.

Red Ochre is a naturally occurring iron oxide that people around the world have used as a pigment for thousands of years. Newfoundland was no exception. Many outport buildings were painted with an inexpensive, protective coat of red ochre mixed with oil. But the European fishermen weren't the first or the most famous red ochre users in the Province.

The Beothuk covered themselves and all their belongings with red ochre. It had an important spiritual significance to them and helped identify them as a group. Over the thousand or more years that the Beothuk and their ancestors lived on the Island of Newfoundland they shared the shores with Inuit and Innu in the North, Palaeoeskimos and Indians from southern Quebec, the Norse, French, English, Irish, Basque and Mi'kmaq. The first use of the term "Red Indian" was a description of the Beothuk's practice of covering their bodies with Red Ochre. Painting your body to identify that you belong to a particular group is still alive and well.

The caribou grease that the Beothuk mixed with the pigment, would have provided some protection from insects in the summer and help insulate the skin in the winter. Have you ever noticed the folks swimming across the English Channel slathering their skin with grease? Its the same idea.

I collect red ochre from Ochre Pit Cove. I don't know if there is any evidence for aboriginal use of the ochre from this community, but it is a good match for the ochre that you see on Beothuk artifacts. Sometimes its a wonder that the Beothuk covered all of their belongings as well as their bodies with red ochre. But as Lori will attest to, if you have one thing in your house covered in red ochre, then everything in your house is covered in red ochre. Red ochre is one of the most gregarious pigments I've ever come across. Its not hard to tell the days that I'm working with ochre, it leaves a telltale trail on my clothes, doorknobs, and face cloths throughout the house.

When Jowi Taylor was putting together the Six String Nation guitar from bits and pieces of Canadiana, like Gretzky's hockey stick and Trudeau's canoe paddle, he chose Red Ochre from Ochre Pit Cove to represent the Province of Newfoundland and Labrador and stain the maple leaf pick guard. Over the years that stain has been wearing off onto the fingers and picks of the hundreds of musicians across the country who played the guitar. Like I said, if you have red ochre on one thing in your house, you have red ochre on everything in your house.

Photo Credits:
Top, Middle Left: Tim Rast
Middle Right: Leader Post
Bottom: Six String Nation Website

Photo Captions:
Top: Beothuk Combs stained with Red Ochre on display in The Rooms, St. John's
Middle Right: Saskatchewan Roughrider Fans demonstrating Rider Pride through body painting
Middle Left: The cliff at Ochre Pit Cove where I collect my ochre. The scree slope at the bottom of the cliff naturally sorts the ochre into different sized grains.
Bottom: The Six String Nation Guitar, showing the wear on the Ochre Stain. Incidentally, the wood its staining is a piece from James Naismith's childhood home.

Friday, July 3, 2009

Local Archaeology Blogs

Here are a few spots that I'm going to get my armchair archaeology fix from this summer. Check out these Newfoundland and Labrador archaeology blogs.
Signal Hill Archaeology: From the first week in July until the first week in August, the 2009 Memorial University Archaeology Field School will be taking place on the top of Signal Hill in St. John's. This blog will be written by students, staff, and the instructor; Amanda Crompton. Amanda and I started grad school at MUN at the same time in 1996 - Look at her now, Man! Now she DRIVES the school bus! You can read about their adventures online or pop by the dig the next time you climb the hill. Be sure to bring your uncle who'll ask them if someone lost a contact.

Burnside Archaeology: Another brand new archaeology blog. 2009 marks Laurie McLean's 20th season in the Burnside area, north of Terra Nova National Park. There's an Interpretation Centre to visit and boat tours to some of the province's oldest and most spectacular archaeological sites. This is the home of the iconic Beaches site and the Bloody Bay Cove Rhyolite Quarry. I love the Burnside Heritage Foundation's logo: I think its the cleverest archaeology logo I've ever seen.

Live Like Dirt: This is one of my favourite local blogs, written by Andrew Holmes, an undergraduate archaeology student at MUN. Incidentally, Andrew is taking the field school on Signal Hill this summer and he participated in my flintknapping workshop last Sunday. You can see his beer bottle point here. For a rational good time, rock and roll and weekly quizzes, Live Like Dirt is a great read.

Photo Credits & Captions: Screen grabs from the linked sites.
Related Posts with Thumbnails